
Migrating from Jenkins to Harness Continuous Integration (CIE) eliminated performance bottlenecks and increased developer productivity by 20%, while unifying CI/CD pipelines for a more efficient software delivery process.
In this blog, we'll be going over our CI tooling migration journey from Jenkins to CIE. This post explains how we planned and executed the actual migration process. For us (a 170 dev engineers org), it took around 1 month to complete. The initial couple of weeks went into planning and identifying owners, and the next two weeks we spent actually migrating jobs. For details on the product development side, see Away from Jenkins.
First, let’s take a quick peek at the problems we were facing with Jenkins:
- Jenkins master memory surge: Over the past few months, we'd struggled to resolve the Jenkins memory surge issue. Often, the Jenkins master’s memory consumption grew higher and it was not able to schedule builds. After going through the logs, we disabled a few plugins. This reduced the frequency of the issue, but didn’t fix it. It used to take a couple of hours to bring up Jenkins, which resulted in a loss of developer productivity.
- Long wait time in queue: Often, builds would often stay in the queue for long durations. Though there were enough resources available, there would be a lag of 10-20 mins between the start of the build execution and the queue entry time. This was a performance bottleneck in Jenkins.
- Long time to schedule agents: Jenkins used to take a long time to provision the pods. We tried to reach out to Google support as we thought this is something happening from the GCP side. However, the problem was not resolved.
Planning the Migration
Considering the problems at hand, we wanted to move away from Jenkins. Here comes Harness CI, a product built for the future, to our rescue! Since it is a SaaS-based CI tool, the overhead of managing the Jenkins master is now gone, and of course, those performance bottlenecks are a thing of the past.
So, how did we take care of the migration?
Initially, the development team did our Proof of Concept with PR-checks jobs (these are CI jobs that run for every PR that gets created - these jobs work as a quality gate) to see if everything worked fine for a few days, and resolve any issues observed. Once we got the green light from the development team, we came up with a plan to migrate all Jenkins jobs to CIE.
Given a short span of time, the main challenge for the migration was finding the owners of those jobs. Previously, Jenkins user privileges were not strict enough for us, and multiple people had job configuration permissions within the organization. So, finding out who owned all the jobs was indeed a challenge! To tackle this situation, we came up with a divide and conquer strategy. We grouped the jobs based on different aspects, created smaller groups, and identified the owners for those.
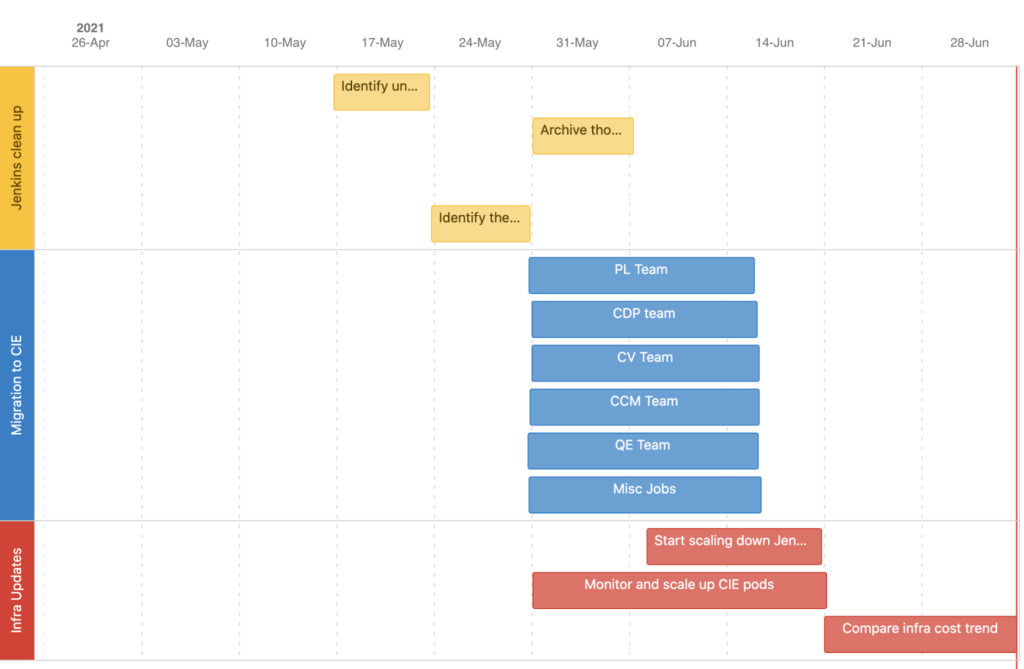
The below image describes an overview of the steps and their timelines. Though the project ran for a month, the actual migration was completed within 2 weeks. I will explain the overall migration process, problems faced during the migration, and how we came up with workarounds to mitigate said problems.
Project Plan
Basically, at the start of the plan, we focused on two things: categorizing the jobs, and finding out the proper backup strategy. We also wanted to release our own CIE product from our CIE jobs themselves. That was a challenge, because any potential bug in CIE hotfix releases would have been difficult to find.
To avoid that, we segregated our releases and all other builds. We run release builds in our staging environment, which is always a version behind production, and all other jobs run in our production account. Having this clean segregation in the jobs and environments helped us avoid any issues with releases.
Execution of Migration
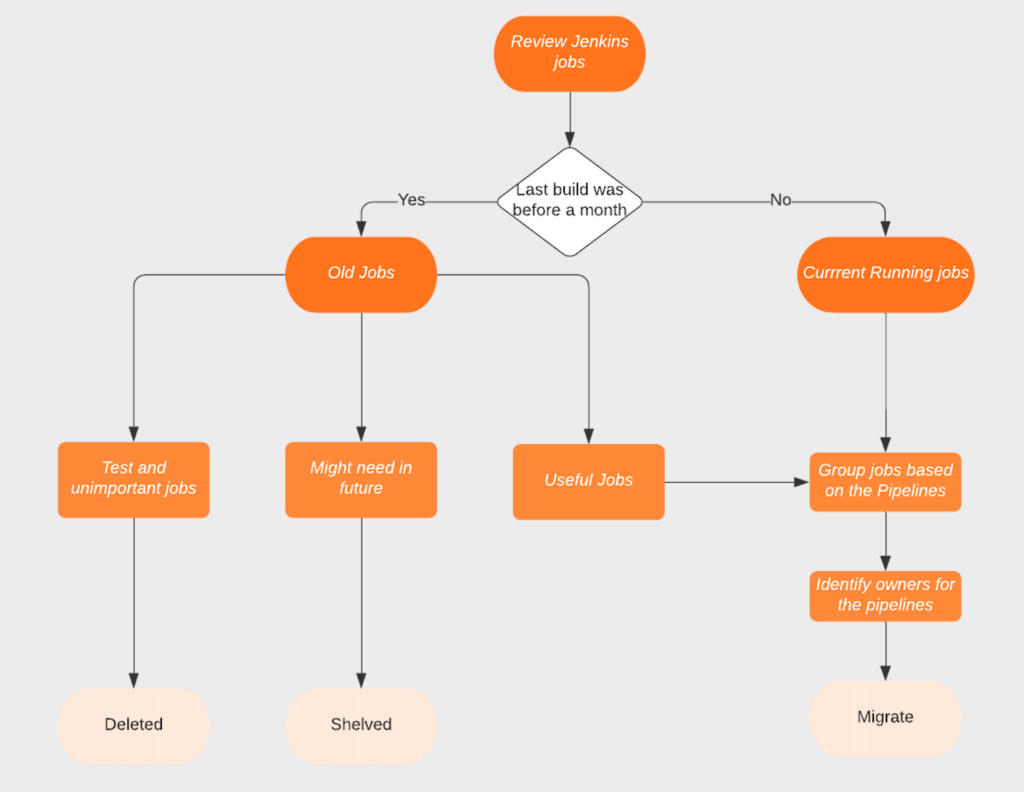
Divide Jenkins Jobs Into Groups
We divided Jenkins jobs into two groups based on their usage. We wrote a groovy script to determine whether the job ran in the previous month or not.
import jenkins.model.Jenkins
import hudson.model.AbstractProject
import java.sql.Timestamp;
def numDaysBack = 30;
def cutOfDate = System.currentTimeMillis() - 1000L * 60 * 60 * 24 * numDaysBack;
println cutOfDate;
Jenkins.instance.getAllItems(AbstractProject.class).each {it ->
println ("=========Unused jobs:\n========");
if (it.getLastBuild() != null && it.getLastBuild().getTimeInMillis() < cutOfDate) {
println it.getFullName();
}
println ("=========Current running jobs:\n========");
if (it.getLastBuild() != null && it.getLastBuild().getTimeInMillis() < cutOfDate) {
println it.getFullName();
}
}
Using this script, we divided the jobs into two groups:
a) Currently running jobs.
b) Unused jobs.
Then, we reviewed the unused jobs to see which jobs could be purged. Purging those jobs was pretty straight forward from the Jenkins UI itself. The challenge was to identify if the jobs that hadn’t run in the past were needed. For those jobs, we came up with a strategy of disabling them for a couple of weeks to see if someone needed them. If someone asked for them, we migrated them. Else, those jobs were deleted.
Backup Strategy
While designing our backup strategy, we had to focus on two different aspects:
a) Backup of Jenkins master and plugins.
b) Backup and restore capabilities for the jobs.
For the first one, we did back up Jenkins home and plugins directory into a storage bucket. But the second one was more important! To make sure we didn’t lose the jobs' configurations and histories, we chose a Jenkins plugin. There were a couple of reasons behind choosing this plugin, namely: a) ease of use - everything could be done from Jenkins UI, and b) it could back up history and configuration for both slaves and master.
Team Collaboration
Once we were done with these tasks, we had clarity on which jobs needed to be migrated and backed up, and which teams should be involved. After the jobs were reviewed, we marked the teams as owners for pipelines. We involved 5 teams who owned some pipelines, along with Build and Tools to collaborate during the migration. If we want to roughly estimate our efforts, I must say we had a couple of build engineers who worked full-time along with 5 representatives of the different teams putting in 20-30% of their bandwidth for a couple of weeks to finish the migration.
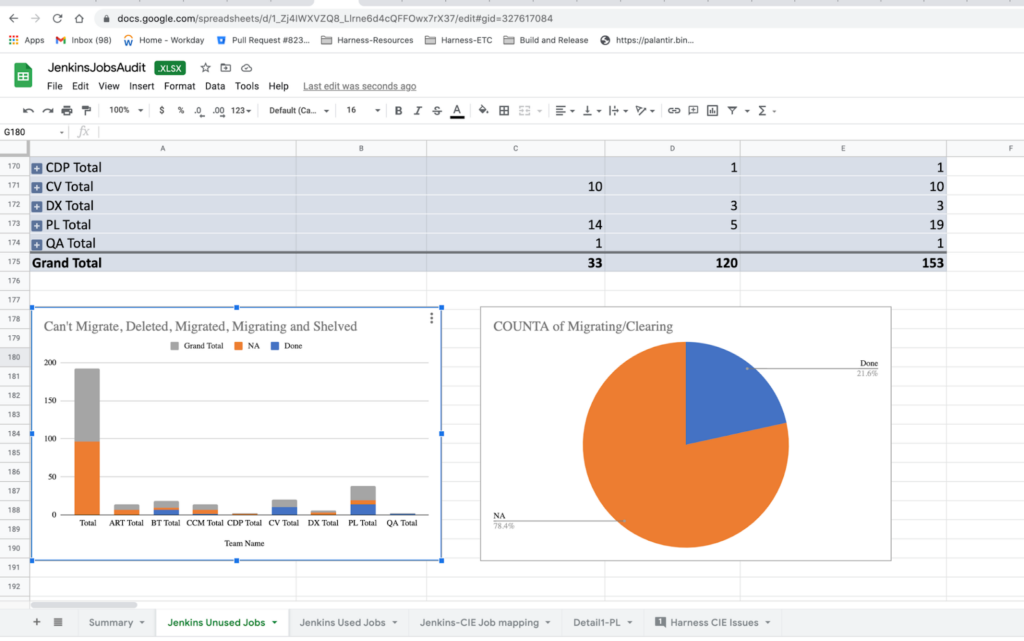
We used a simple Google doc to prepare the job lists and tracked the progress of the migration through the document. Overall, the project was tracked in Asana.
In the below screenshots, you can see how we segregated the jobs and divided team-specific jobs to start the migration. First, we did a gap analysis between Jenkins and CIE to make sure that we did not miss anything important.
Scaling Down Jenkins

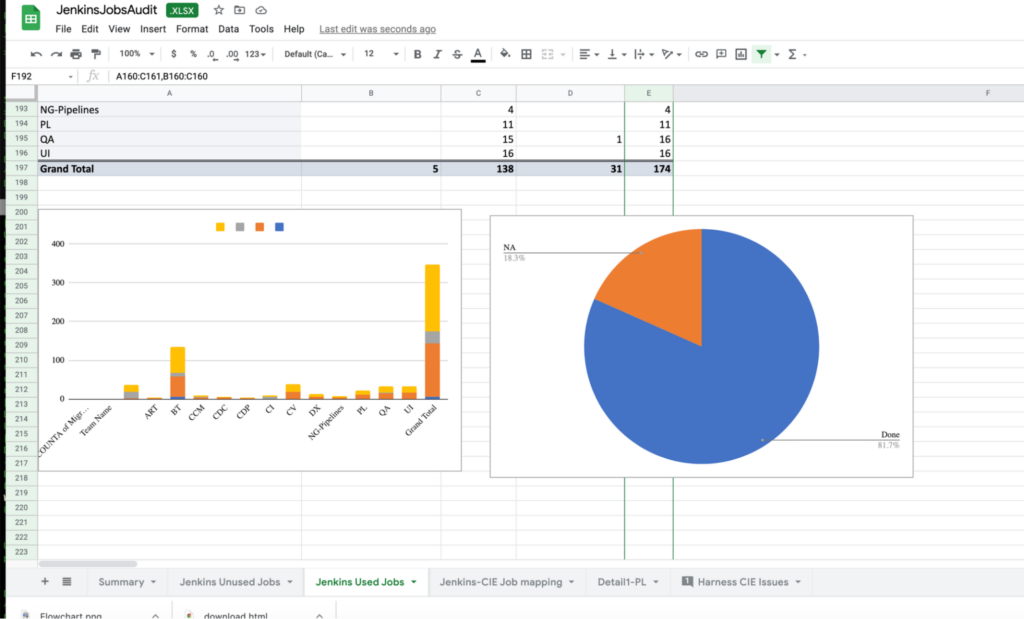
Though we had a few hiccups during the migration, we did migrate most of the jobs within a couple of weeks. Initially, there were 4 jobs we couldn’t migrate. Among them, two are now working with the strategy I mentioned above. With the help of other teams, we successfully migrated 167 jobs within a short timespan. This wouldn’t have been possible without the collaboration from everyone involved.
I am attaching the summary from the migration to give you an idea about the number of jobs we migrated, and what jobs we could not migrate. The actual migration started on June 31st and completed on May 13th.

The first step we took in Jenkins was to stop scheduling new jobs. We did that from Jenkins administration. Then, we started scaling down all the node pools attached to Jenkins. Once all the node pools were drained properly, we made sure all the jobs were migrated successfully, and no one raised any concerns about those unused jobs. We successfully shut the Jenkins master down on the 14th and announced it.
CIE Concepts and Best Practices
During the migration, I realized the configuration in CIE is pretty simple and easy to use. I must say, it has been a great experience comparing existing CI tools like Jenkins, Teamcity, Travis CI, GitLab etc. to Harness. As a general practice, we use a CI tool to build pipelines and download code, run tests, run static checks, and publish artifacts generated from the build process. To do these operations, we require connections to external systems with CI - for example, GitHub, Sonar, GCR, Docker Hub, etc. - and we use credentials to connect to those external systems. We also configure the build, steps, and notifications in CIE. I will try to highlight different concepts and features in CIE so that it will be easier to understand the requirements for the migration process.
All you need is a Harness CIE SaaS account and a Kubernetes cluster to start building your pipelines to develop, test, and deploy your application.
Account Configurations
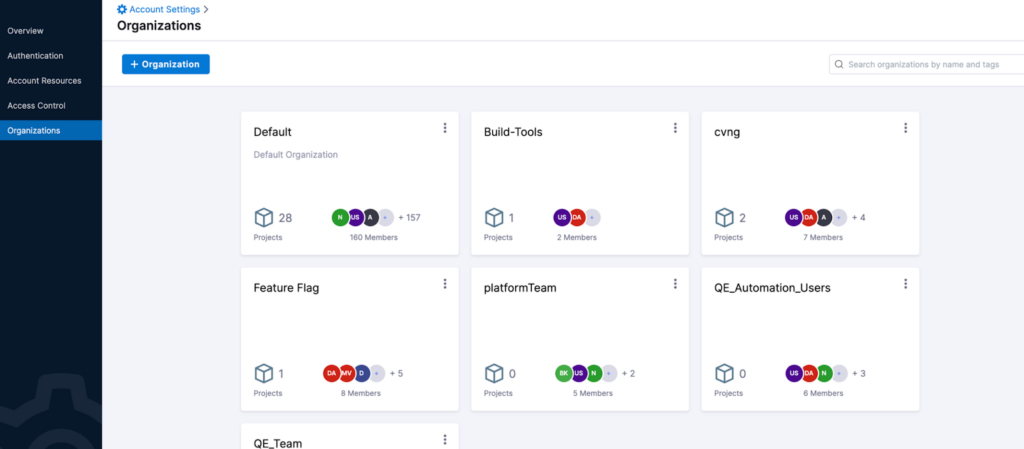
Orgs and Projects: Harness CIE supports hierarchical models for project management. As administrator, you may want to segregate CI jobs based on teams. This will help you have better access control over those projects. First, we create organizations so that projects can be mapped to them. To do this, go to Account Settings → Organizations. After that, whenever you create projects by going to Home → Projects, you should select the right org. You can assign users to orgs to better manage the access control.
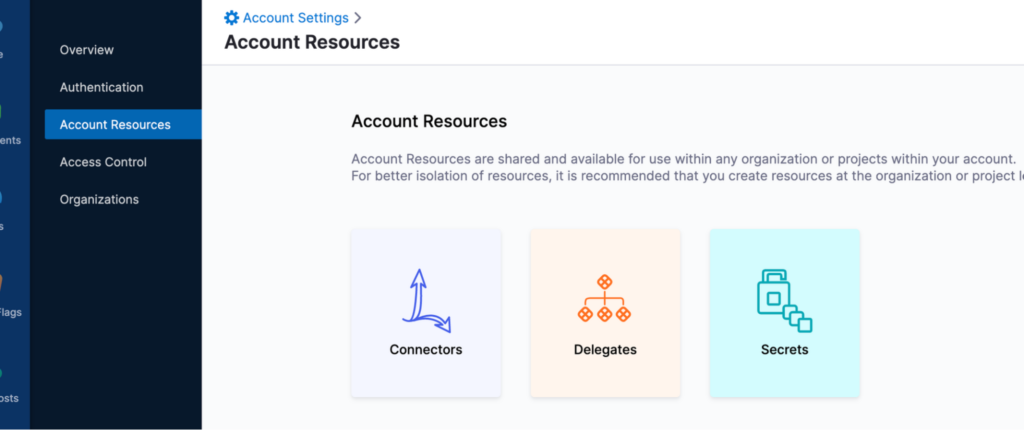
Connectors and Secrets: This is a wonderful feature when compared to Jenkins! All external connectors and secrets can be managed with ease. To do this, go to Account Settings → Account Resources. One thing I want to mention as a good practice: CIE does support account- and project-level connectors and secrets. So while creating them, please make sure you are not creating them unnecessarily at the project level. That will expose a lot of difficulties in access control.
We have many different types of connectors, such as GitHub, JFrog, Vault, Docker Hub, Kubernetes, and more. Since we use K8s-based pods to run our builds, we use Kubernetes connectors for the communications. As account-level secrets, we have credentials used for connectors, and some global secrets like Jira credentials that are used for most projects, signing certificates, etc.
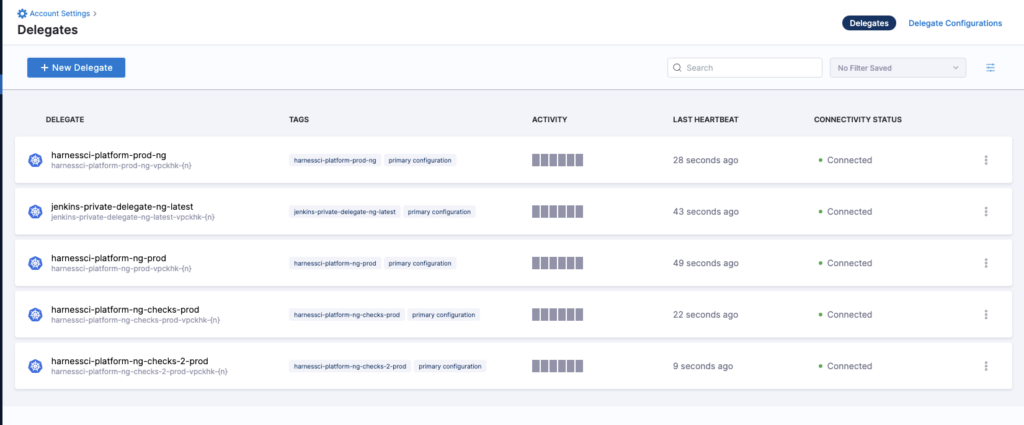
Delegates: This is how a CIE application will operate with the Kubernetes cluster. This jar is responsible for handling all tasks initiated by the user.
Authentication: You can integrate public OAuth providers with CIE to authenticate users - for example: Google, Linkedin, Bitbucket, etc.
Project Configurations
Pipelines: Ideally, every project should be owned by an org/team in your company. Each project can hold multiple pipelines. Project-specific users, connectors, and secrets can be configured by selecting Project → Project Setup. This is something you should be managing properly. Keeping the project, account connector, and secrets separate should be done as a best practice.
Pipeline and Stage Configurations
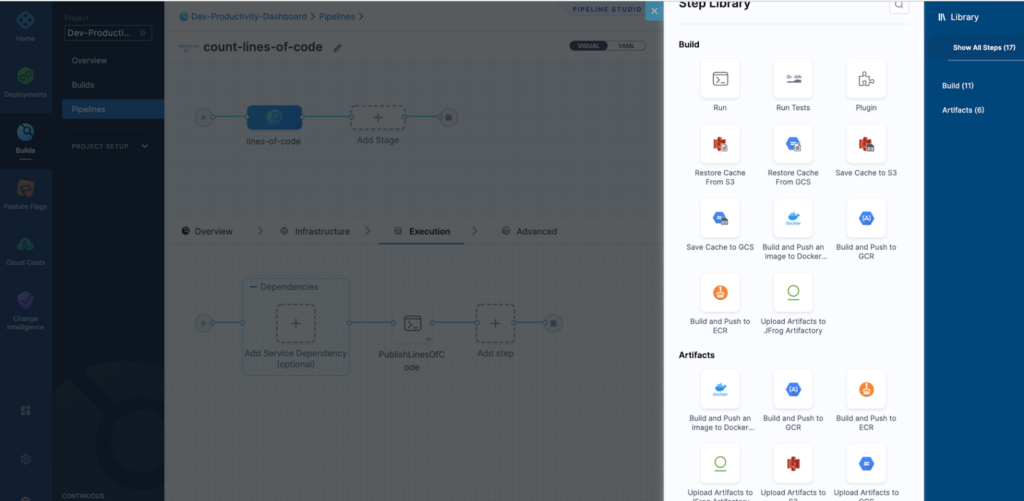
Stages: Each pipeline is a combination of stages. You can add sequential/parallel stages during pipeline creation. This was not supported by the earlier version of Jenkins. Complex pipelines can be divided into different stages. You can use the UI to create steps, and drag-and-drop to arrange them. This is not supported by most other CI tools.
Infrastructure: This is where you want your stages to be executed. In Jenkins, we had to specify the labels of the agents to mention. Configuration of agents was in a separate page inside the "Manage Jenkins" menu option. CIE is more flexible here. You can run multiple stages in different containers - Jenkins does not support this.
Step: Each step is a combination of stages. CIE supports different kinds of steps (e.g. Run, Upload Artifacts to S3, Build and Push to GCR, etc.), similar to Jenkins.
Triggers: Like any other CI tool, CIE supports triggers with Timer, GitHub, Bitbucket, etc. While migrating, you can configure Jenkins build triggers as CIE triggers easily.
Benefits of Migrating
Migrating to CIE helped us avoid the issues we were facing with Jenkins. There were other benefits that we are now seeing:
Developer Productivity: With Jenkins going down once or twice a week, there was a constant productivity loss during downtime. In fact, getting rid of the queue wait time and pod allocation delays significantly increased our developer productivity. I would say we’ve increased developer productivity by about 20% through our migration to CIE.
Visibility: With CIE being our own in-house product, we do have a lot more visibility on the tool. Intermittent failures were debugged easily compared to Jenkins, where multiple things were 'blackbox' for us.
CI & CD: Since we used Jenkins for CI and Harness for CD, our delivery pipelines weren’t unified. But after the migration, we can now use Harness exclusively for CI/CD. This has enabled us to have a single pipeline that builds our code and deploys it to our QA environment. This is a great feature to have. Going forward, we do have some plans to improve in this area!
Conclusion
We love ending articles on a high note, so we’ll leave it here! CIE makes life easier for our engineering org, and we’re sure it could make yours easier too. If you’re still in the learning stage, we’d love to invite you to read more about Test Intelligence, a CIE feature that can save you even more time and effort.

All this author’s posts
Udham Singh orchestrated end-to-end release workflows for Docker, Kubernetes, and microservices, with integrated image scanning, SBOM, and security automation.